The Science of Passive Evaporation on the Trail
Ventilated gear management is essentially the art of managing the boundary layer of air surrounding your equipment. When you pack wet items—like a rain shell, a sweat-soaked base layer, or a damp tent fly—into a waterproof pack, you create a micro-greenhouse that facilitates rapid bacterial growth. A mesh containment system breaks this cycle by allowing continuous air exchange, which lowers the vapor pressure around the fabric and encourages moisture to move from the material into the atmosphere.
In my experience trekking the humid trails of the Pacific Northwest and the Appalachian Trail, the difference between a "dry-enough" kit and a moldy disaster is often 200 square inches of high-tenacity polyester mesh. Professional guides often refer to this as "active-passive drying." You aren't sitting by a fire; you are using your own kinetic energy to force air through the mesh pores.
Consider the physics: a standard 10-liter mesh sack attached to the exterior of a pack increases the available drying surface area by nearly 300% compared to stuffing that same gear into an internal pocket. Data from textile durability studies suggests that leaving synthetic fabrics damp for more than 12 hours can reduce tensile strength by up to 15% due to microbial degradation in certain organic-heavy environments.
Critical Failures in Mobile Gear Maintenance
The most common mistake is the "stuffed sausage" effect. Many travelers buy a mesh bag and pack it so tightly that the center of the gear mass never sees a breeze. This creates a deceptive situation where the exterior feels dry, but the core is a breeding ground for Staphylococcus aureus and various fungal spores.
Another major pain point is the "pendulum problem." Improperly secured external bags shift the center of gravity, causing fatigue and potential injury on technical terrain. I once observed a hiker lose their balance on a river crossing because a water-heavy mesh bag swung outward at the exact wrong moment.
Neglecting UV exposure is the third silent killer. While mesh allows air in, it also allows harsh sunlight to reach your gear. Constant exposure to high-altitude UV rays can degrade lightweight sil-nylon and high-performance laminates faster than the moisture itself would. The consequences are clear: delaminated seams, foul-smelling kits that contaminate clean clothes, and expensive gear that fails years before its intended lifespan.
Professional Strategies for Accelerated Drying
To turn a simple mesh sack into a high-efficiency drying machine, you must treat it as an engineered component of your kit.
Strategic Layering and Internal Volume Optimization
Don't just shove gear in. Turn your garments inside out to expose the highest moisture-retention areas (like armpits and waistbands) to the mesh wall. Use "lofting"—shaking the bag every hour to reposition the contents. This ensures that different sections of the fabric hit the "airflow strike zone."
By maintaining a 60% fill ratio, you allow the gear to tumble slightly as you walk. This mechanical agitation acts like a low-speed dryer, preventing the fabric from "pancaking" and trapping moisture in folds.
External Mounting and The Chimney Effect
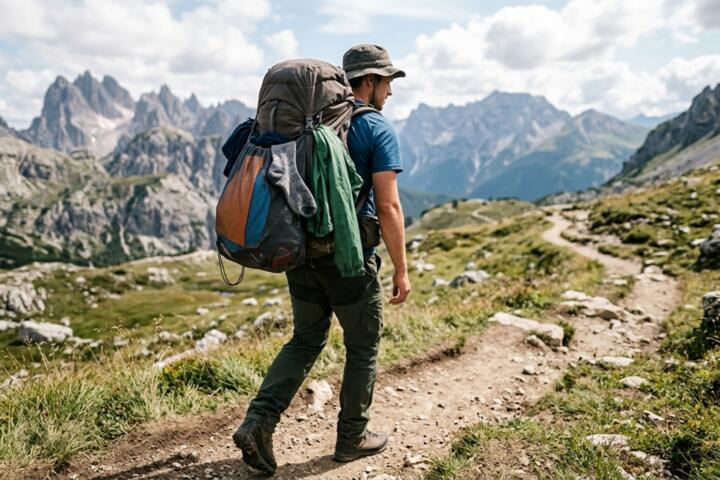
Attach your mesh system to the "low-pressure" zones of your backpack, typically the rear face or the very top. Avoid the sides if you are bushwhacking, as mesh is prone to snagging on rhododendron or briars. Use Nite Ize S-Biners or high-strength carabiners to create a four-point tension system.
A four-point mount prevents the bag from swaying and creates a "chimney effect." As heat rises from your back and the sun hits the dark mesh, it creates a small thermal updraft that pulls air through the bottom of the bag and out the top, even when you are standing still during a break.
Material Selection: Not All Mesh is Equal
Professional-grade systems like those from Sea to Summit or Mystery Ranch use multi-filament hexagonal mesh. Unlike cheap "laundry bag" mesh, these resist stretching when wet. A sagging bag loses its aerodynamic properties and creates a moisture trap at the bottom.
Look for "no-see-um" mesh for small items like socks to prevent loss, but for heavy jackets, use a wide-hole "spacer mesh." This provides the structural integrity needed to hold the weight of a water-logged hardshell without tearing at the seams.
Managing Weight Distribution and Drainage
Water is heavy—one liter weighs approximately one kilogram (2.2 lbs). If you are carrying a soaked tent fly in an external mesh bag, you are adding significant weight to the furthest point from your spine.
The fix is to wring out gear using the "towel roll" method before bagging. Place the wet item inside a dry camp towel, roll it tight, and step on it. This removes up to 40% of the initial water weight, making the mesh bag's job significantly easier and your pack more stable.
UV Protection and Shadow Placement
To combat UV degradation, mount your mesh bag underneath the "brain" or top lid of your pack if possible, or use the bag's own shadow. If you are hiking south, mount the bag on the north-facing side of your pack. Brands like Osprey design their stretch mesh pockets with high-denier fabrics precisely to balance breathability with a degree of shade for the contents.
Practical Field Cases
Case 1: High-Humidity Expedition in Borneo
A research team used heavy-duty mesh ditty bags to manage sweat-soaked field uniforms. Initially, they suffered from "jungle rot" on their clothing. By switching to a system of external mesh bags mounted with 1-inch webbing to the outside of their technical packs, they increased airflow.
- Result: Drying time for synthetic shirts dropped from 48 hours (unmanaged) to 6 hours during active trekking. Equipment lifespan increased by an estimated 30% over the six-month project.
Case 2: Fast-Packing the Colorado Trail
An ultralight athlete needed to dry a damp ultralight quilt after a night of heavy condensation. Using a custom-made oversized mesh "front pack" (worn on the chest), they leveraged the wind generated by their own forward movement (approx. 3-4 mph).
- Result: The quilt was fully lofted and dry within 90 minutes of morning movement, preventing the 2-pound weight gain associated with moisture-logged down insulation.
Gear Management Comparison Table
| Feature | Lightweight Mesh Sack | Heavy-Duty Cargo Mesh | Stretch-Woven Pockets |
|---|---|---|---|
| Best For | Socks, base layers, buffs | Tents, rain shells, boots | Maps, water filters |
| Durability | Moderate (snag prone) | High (abrasion resistant) | Very High |
| Airflow Rating | 9/10 | 7/10 | 4/10 |
| Weight | 15g - 40g | 60g - 150g | Integrated into pack |
| Key Brand | Sea to Summit Ultra-Mesh | Mystery Ranch Zoid | Gregory/Osprey (Built-in) |
Common Mistakes to Avoid
- Mixing Wet and Dry: Never clip a mesh bag over a dry compartment if the mesh bag doesn't have a waterproof backing. The "bleed" will soak your dry reserves.
- Overexposure: Leaving gear in a mesh bag on the back of a vehicle. High-speed highway winds can actually fray the fibers of delicate technical fabrics through "wind-whipping."
- Neglecting Salt: If you are near the ocean, salt crystals trap moisture. Rinse gear in fresh water before mesh-drying, or it will never truly dry due to the hygroscopic nature of salt.
- The "One-Clip" Fail: Only using one carabiner. This leads to the bag spinning, which can tangle in your legs or gear. Always use at least two points of contact.
FAQ
Can I dry a down sleeping bag in a mesh bag while hiking?
It is risky. Down clumps when wet and requires significant lofting. You can "air it out" in a large mesh sack, but do not expect it to dry completely unless you stop and manually shake it every 30 minutes. Use this method only for synthetic insulation or very lightly damp down.
Will the mesh tear my expensive waterproof jacket?
High-quality gear mesh is designed to be smooth. However, zippers and buckles on your jacket can snag the mesh. Always zip up all closures and turn the jacket inside out before placing it in the bag to protect both the mesh and the jacket's membrane.
How do I stop the "wet dog" smell in the mesh bag itself?
Mesh is usually polyester or nylon and shouldn't hold odors, but the "biofilm" from your clothes can transfer to it. Soak your mesh bags in a solution of Nikwax Tech Wash or a simple white vinegar mix once a month to kill embedded bacteria.
Is it better to hang the bag vertically or horizontally?
Vertical is superior for drainage (gravity helps pull water to the bottom corner), while horizontal is better for surface area exposure to the wind. For most hikers, a vertical hang on the back of the pack is the most ergonomic and effective.
What is the ideal mesh hole size?
For maximum drying, a hole size of approximately 1mm to 2mm is ideal. Anything smaller (like midge-proof mesh) restricts airflow too much; anything larger risks losing small items like GPS units or keys.
Author’s Insight
In twenty years of mountaineering, I’ve learned that "dry" is a relative term. I never expect my gear to be bone-dry by the time I hit camp, but I use mesh bags to manage the moisture "budget." My go-to trick is using a bright orange mesh bag; it serves as an emergency signal panel while simultaneously drying my socks. I always carry two extra 5-liter mesh sacks—they weigh nothing and are the best insurance policy against the dreaded mildew smell that can ruin a multi-week expedition.
Conclusion
Effective gear drying while on the move is a combination of choosing the right materials, understanding airflow, and maintaining a disciplined packing routine. By moving wet items to the exterior of your pack in a structured mesh system, you protect your technical investments and improve your trail comfort. Start by auditing your current pack setup: identify one item you usually "stuff" away wet and transition it to an external mesh containment strategy on your next outing. Your gear, and your nose, will thank you.