Field-Based Insulation
A down jacket is essentially a pressurized vessel of heat. The loft of 800-fill power goose down relies on a fragile, ultra-thin nylon or polyester face fabric, often as thin as 7 to 20 denier. When a snag occurs, the internal pressure and the "springiness" of the down clusters force the insulation out of the hole. This is known as "down leakage," and it can reduce the thermal rating of a jacket by several degrees in a single afternoon if left unaddressed.
In the wild, your environment is your primary enemy during a repair. Humidity, freezing temperatures, and skin oils interfere with the molecular bond of adhesives. Traditional tapes, like standard silver duct tape, use a thick rubber-based adhesive that becomes brittle in the cold and leaves a gooey residue that can permanently ruin high-end fabrics like Pertex Quantum or Gore-Tex Infinium. Professional-grade repair tapes, such as Gear Aid Tenacious Tape, use a silane-modified polymer or acrylic adhesive that remains flexible down to sub-zero temperatures.
Statistics from repair centers like Rainy Pass Repair suggest that nearly 40% of damaged technical garments sent for professional restoration have been further damaged by the application of inappropriate home adhesives. Real-world testing shows that a correctly applied patch of TPU (Thermoplastic Polyurethane) tape can maintain 95% of the original fabric’s burst strength, ensuring the jacket survives the remainder of an expedition.
Cost of Improper Patching
The Critical Failure of Standard Adhesives
The most common mistake is using heavy-duty construction tapes. These are designed for rigid surfaces, not the constant flexion of a human body in motion. When you move, the fabric stretches, but the duct tape does not. This creates "stress risers" at the edges of the tape, often causing the ultra-light nylon to tear further right at the seam of the repair.
Thermal Loss and Moisture Seepage
A hole isn't just an exit for down; it is an entrance for moisture. Once down clusters get wet, they lose their ability to trap air (loft), and their thermal conductivity increases. If you are in a survival situation at 4,000 meters, a 2-inch tear that goes unpatched can lead to localized hypothermia within hours as the "bellows effect" pumps warm air out of the jacket with every breath you take.
Permanent Fabric Degradation
Using the wrong solvent to clean a tear—such as high-concentration acetone or nail polish remover found in a travel kit—can melt the DWR (Durable Water Repellent) coating or even the synthetic fibers themselves. This creates a "hard spot" in the fabric that can never be fully restored, even by professional services like Rugged Thread.
Field Restoration Steps
Selection of Technical Repair Media
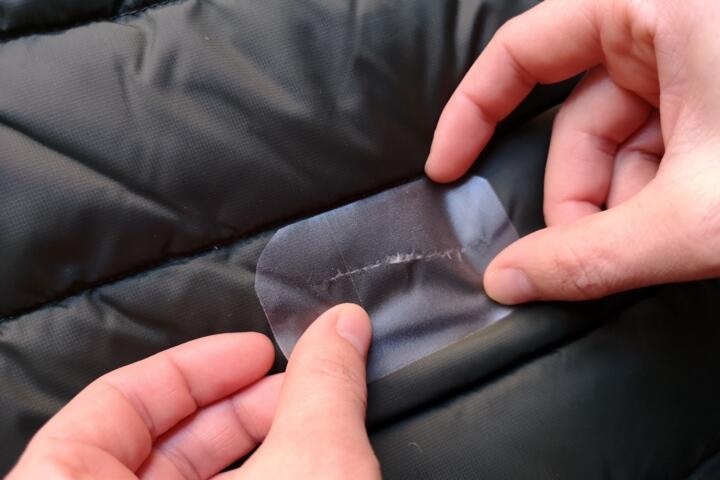
The gold standard for field repair is a dedicated technical tape. Gear Aid Tenacious Tape (specifically the "Silnylon" version for silicone-treated fabrics) or NOSO Patches are the industry benchmarks. These tapes are designed with a high "tack" but low "creep," meaning they stay where you put them without sliding over time. For high-wear areas like elbows, a Cordura-backed patch is superior to a standard clear TPU patch.
The Anatomy of a Perfect Field Patch
To achieve a bond that lasts years rather than hours, the patch must be circular or oval. Sharp corners are the primary points of failure; they catch on backpack straps and peeling begins there. By rounding the corners with a radius of at least 0.5 inches, you distribute the peeling force across a continuous curve, significantly increasing the lifespan of the repair.
Site Preparation Under Stress
Cleanliness is the difference between a temporary fix and a permanent one. Even in the wild, you must remove skin oils and dirt. A small alcohol prep pad from a first aid kit is sufficient. You must wait exactly 60 to 90 seconds for the isopropyl alcohol to fully evaporate. Applying tape to damp alcohol will "kill" the adhesive bond instantly.
Managing Down Migration During Repair
Before applying the tape, you must ensure no down feathers are trapped under the adhesive. Trapped down creates a "bridge" that allows air and water to tunnel under the patch. Use a blunt object, like a rounded tent stake or a clean fingernail, to push the feathers back into the baffle. If a feather is halfway out, do not pull it; this often pulls more down with it. Instead, reach from the inside and pull it back in, or trim the quill carefully.
Thermal Setting of Adhesives
While these tapes are "pressure-sensitive," they are also "thermally reactive." After applying the patch and smoothing out all air bubbles from the center outward, use your body heat to set the bond. Press your palm firmly over the patch for 2 to 3 minutes. On a sunny day, exposing the black or dark-colored patch to direct sunlight for 10 minutes can increase the bond strength by up to 30% through localized heating.
Lessons from the Trail
Case 1: The Appalachian Trail Thru-Hike
A hiker using an Arc'teryx Cerium jacket suffered a 3-inch snag from a rogue branch. Initially, the hiker used a Band-Aid, which failed within two hours due to sweat. After reaching a resupply point, they applied a Gear Aid hex-shaped patch. By cleaning the area with a 70% IPA wipe and applying the patch with significant pressure, the jacket survived another 1,200 miles of hiking and multiple wash cycles in commercial machines.
Case 2: Alpine Climbing in the Chamonix Valley
A climber’s belay parka (a heavy-duty Mountain Equipment model) was singed by a camp stove, creating a melting hole. Because the fabric was slightly charred, standard tape wouldn't stick. The climber used a multi-stage approach: trimming the charred edges, using a small amount of Seam Grip +WP around the perimeter, and then overlaying a NOSO fabric patch. The result was a waterproof, airtight seal that withstood the high-friction environment of chimney climbing and remained intact for the entire season.
Field Repair Comparison
| Material Type | Best Use Case | Durability Rating | Flexibility |
|---|---|---|---|
| TPU Clear Tape | Transparent/Invisible fixes | High | Excellent |
| Nylon Fabric Tape | Matching color/texture | Medium | Good |
| Duct/Gaffer Tape | Emergency only (< 24 hrs) | Low (leaves residue) | Poor |
| Silnylon Patches | Silicone-treated ultralight gear | High | High |
| Heat-Set Patches | Permanent home/basecamp fix | Maximum | Moderate |
Critical Errors to Avoid
Patching Over Dirt and DWR
Most high-end jackets from brands like Patagonia or The North Face feature a heavy DWR coating. This coating is designed to repel liquids, including liquid adhesives. If you don't "strip" the DWR locally with an alcohol wipe, the tape is essentially sticking to a layer of wax rather than the fabric. It will peel off the moment the jacket gets cold or wet.
Over-Filling the Repair
In a panic, hikers often try to stuff more material into the hole or use too much tape. A patch should extend at least 0.75 inches (19mm) beyond the edge of the tear in every direction. Using a patch that is too small ensures failure because the "tension zone" of the fabric during movement will pull the edges of the tape apart.
Ignoring the "Inner" Repair
If the tear is large (over 2 inches), the internal baffles may also be damaged. If you only patch the outside, down will migrate between the baffles, creating cold spots. While difficult in the wild, try to pinch the internal baffle mesh and keep it separate from the face fabric while applying your external patch.
FAQ
Can I wash my jacket after applying repair tape?
Yes, but you should wait at least 24 to 48 hours for the adhesive to fully cure. When washing, use a front-loading machine and a dedicated down wash like Nikwax Down Wash Direct. Avoid high heat in the dryer, as it can soften some adhesives and cause the patch to shift.
Will the tape work on a wet jacket?
Most pressure-sensitive adhesives will not bond to wet surfaces. You must dry the area around the tear. Use a pack towel, then hold the area near (but not too close to) a stove or inside your waistband to use body heat to drive off residual moisture before applying the tape.
What if my jacket is made of "Silnylon"?
Standard repair tapes will fail on Silnylon because nothing sticks to silicone except silicone. You must use specialized patches like Gear Aid Silnylon Patches or a liquid silicone adhesive like SilNet.
How do I remove the tape if I want a professional repair later?
A professional service like Boulder Mountain Repair can remove most technical tapes using specialized solvents. Do not try to pull it off yourself, as you risk delaminating the fabric. Tell the professional exactly what brand of tape you used.
Is clear tape better than colored tape?
Clear TPU tape is excellent for being "invisible," but it can yellow over time due to UV exposure. Colored nylon tapes offer better UV protection for the adhesive and usually blend better with the matte finish of technical gear.
Author’s Insight
In my fifteen years of backcountry expeditions, I have learned that a "repair kit" is not an admission of failure but a sign of a prepared traveler. I once watched a partner lose nearly a third of their insulation on a windy ridge because they didn't have a patch ready. I now pre-cut my Tenacious Tape into various sized circles and stick them to the inside of my first aid kit lid. This eliminates the need for scissors in the wind and ensures that I can seal a leak in under thirty seconds. Remember: the faster you seal the hole, the more loft you save, and loft is life.
Summary
Repairing a down jacket in the wilderness is a surgical procedure performed in a hostile environment. By selecting high-quality polymer-based tapes, rounding your corners to prevent peeling, and meticulously cleaning the substrate to remove DWR coatings, you can create a bond that lasts for the life of the garment. Do not settle for temporary fixes that leave damaging residues; invest in technical adhesives that match the engineering of your gear. Once you return from the field, inspect your work, and if the tear was significant, consider a professional sewn reinforcement to ensure your jacket remains a reliable shield against the elements for years to come.